This is a guide how to fix a possible overheating problem. Note that I take no responsibility for whatever damages you might cause to your computer. It's on your own risk and warranty will of course void at this operation.
Anyway...
Some time ago my Fujitsu-Siemens Amilo D 8820 started to overheat and shut down everytime I started an application more demanding than Mozilla Firefox. Since the laptop was out of warranty, I decided to do some under the skin dust-cleaning. After looking around on the net I found some information how to open the laptop. It is not done by unscrewing the bottom, as one probably would think.
You will need:
 1) Open the computer lid as much as possible. There is a plastic shell around the hinges. This one should be bent carefully
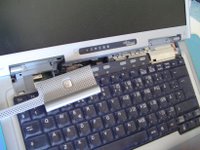 2) Remove the keyboard by unscrewing the three screws holding the keyboard. Be careful so that the screws don't fall down. If they do you might have a hell getting them out of there. It's a bit scary to bend the keyboard, but you have to use a little violence to get it out of there.
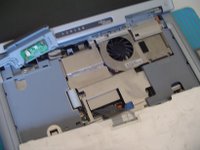 3) Remove the processor heatsink. There are four screws. Remove all old silicon/paste from the processor and heatsink with alcohol.
 4) Open the heatsink by unscrewing and clean it carefully. My heatsink was filled with dust and there is no wonder why the laptop did overheat. Put the heatsink back together
 5) Apply new cooling paste onto the processor. Put back the heatsink, the keyboard and the other stuff the opposite way you removed it
When you completed these 5 step your computer will hopefully not be overheating. If it still does you might want to consider buying a new one. /Carl
Anyway...
Some time ago my Fujitsu-Siemens Amilo D 8820 started to overheat and shut down everytime I started an application more demanding than Mozilla Firefox. Since the laptop was out of warranty, I decided to do some under the skin dust-cleaning. After looking around on the net I found some information how to open the laptop. It is not done by unscrewing the bottom, as one probably would think.
You will need:
- Slotted and precision star screwdriver
- Alcohol to clean the CPU with
- CPU-paste
 1) Open the computer lid as much as possible. There is a plastic shell around the hinges. This one should be bent carefully
 2) Remove the keyboard by unscrewing the three screws holding the keyboard. Be careful so that the screws don't fall down. If they do you might have a hell getting them out of there. It's a bit scary to bend the keyboard, but you have to use a little violence to get it out of there.
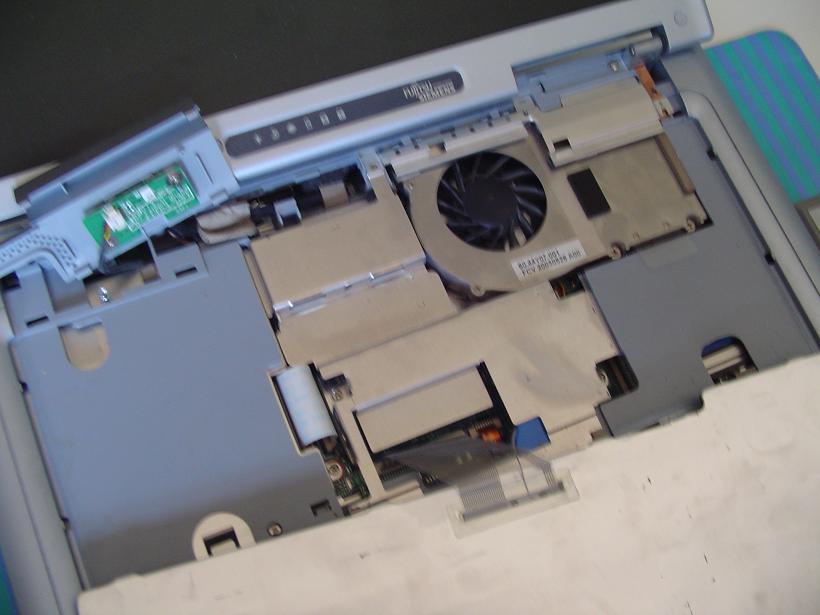 3) Remove the processor heatsink. There are four screws. Remove all old silicon/paste from the processor and heatsink with alcohol.
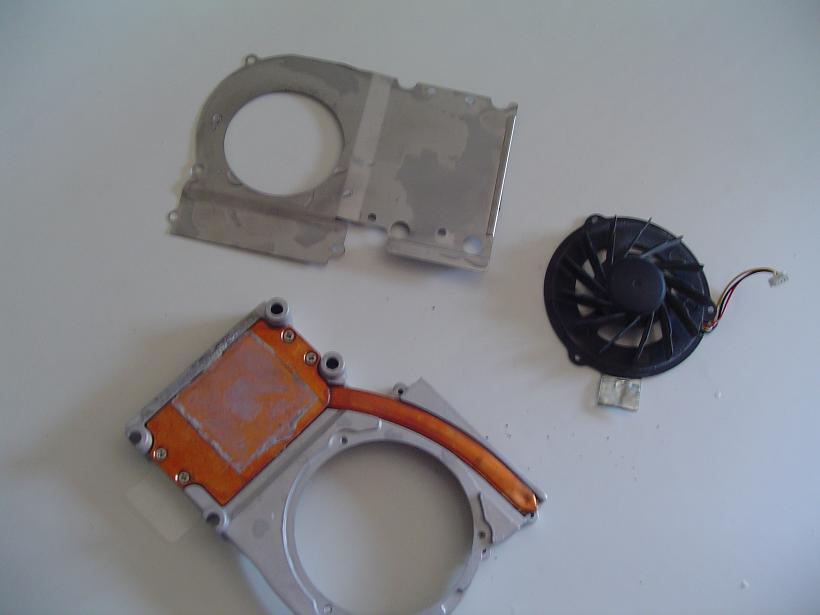 4) Open the heatsink by unscrewing and clean it carefully. My heatsink was filled with dust and there is no wonder why the laptop did overheat. Put the heatsink back together
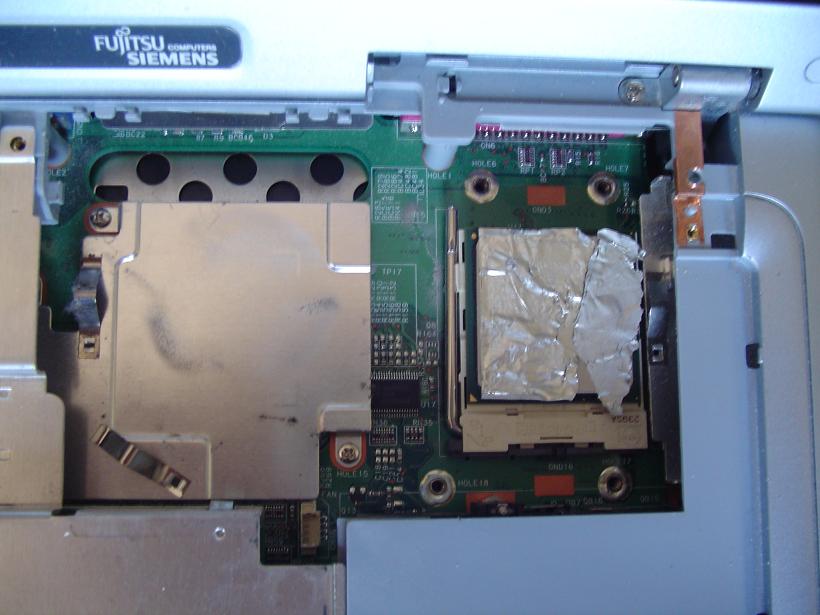 5) Apply new cooling paste onto the processor. Put back the heatsink, the keyboard and the other stuff the opposite way you removed it
When you completed these 5 step your computer will hopefully not be overheating. If it still does you might want to consider buying a new one. /Carl
posted by Carl Löndahl at 7:44 AM
![]()

34 Comments:
Hi. Thanks for your comment!
CPU Thermal Paste is not hard to find. Walk into the nearest computer shop and you will probably find it. You don't have to buy the most expensive one. With most paste comes an instruction how to apply it.
Computers are sensitive electronics. You should be connected to ground when you deal with the parts (ESD protection). This is not _really_ necessary, but before you begin be sure to touch some grounded metal like a radiator or sink to remove all static electricity.
Obvious but not to forget: the computer should never be connected to AC while open.
I think if you follow the guide as much as the case construction allows (i e no violence) you will find that fixing the computer requires no techie skills. If you still feel uncomfortable, maybe there is someone that can help you?
//Carl
My computer did only boot when the heatsink was connected. The fan was just spinning for a few seconds though.
Did you remove any other stuff than the heatsink?
There should be no re-boot procedure. Maybe if you remove the battery and plug in and run on the AC? That worked for me one time when the computer wouldn't start.
I'm very happy about your guide. It worked just fine and my Laptop is going on strong again. Thanks
Hello ! Thank you for the information. I've made all except putting the paste. Now, I have the same problem as bodelski. Any suggestions ?
I've found out the problem. My CPU was stuck to the heatsink, so when i reassembled the computer the CPU was not well placed. I had to seperate the CPU, I cleaned the old paste and put the new one. Now it works fine...
According to one of my HW experts where I work he says that to remove the CPU you simply heat up the heatsink with an air gun (or hot hair dryer) until the thermal paste becomes fluid.
Then simply remove the CPU.
Do NOT remove the thermal paste!!
Put the CPU in the socket and screw in the heat sink unit.
Once the system has been running long enough the thermal paste will become fluid and automatically reseal fully to the heat sink.
It is not necessary (or desired) to remove the thermal paste with alcohol and the add thermal paste and in fact can be a problem since people tend to apply way too much thermal paste.
In any case thanks for the guide on how to do this because like a large number of Amilo D owners my laptop constantly shuts down due to overheating. Since my fan and vents were very clogged I am sure that this will fix the problem (at least for a year or two).
Thanks.
This comment has been removed by the author.
Hello ! Thank you for the information. I ahve follow the guide and put everythings back carefully but Now I have the same problem as bodelski. Any suggestions ?
I followed your guide for a Amilo 8820 and it helped! MANY thanks!
First time after reassembling the computer the screen went black.. a very small piece of old paste/metallic foil was stuck between 4 pins on the processor. After removing that the computer worked fine!
Hello
Thank you, this worked for 8800 aswell. But i did only the lightversion i e opned the computer and blowed away all dust. Looked as mouses have lived there.
thanks
Per-Johan
Great article, Carl - exactly what the doctor ordered. My Amilo now hums again instead of whining and I can even hear music on it again!
Below, I'll add a few remarks regarding the article that may be useful to somebody. Corrections and general abuse (well-meant) are welcome.
0. I didn't need a precision star screwdriver at all - one philips was enough. My Amilo was bought from Germany & has a German keyboard but it's otherwise identical to the one in the photos. All the screws had simple cross heads though.
1. I think the best way to open the plastic lid is to insert a small screwdriver about half an inch on the top of each side of each plastic hinge cover (4 moves, that is) and gently pull upwards. Mine came off very easily. A bit of wiggling and the whole thing's off. Do remember the bottom of the on/off button is connected to the mainframe via a cable.
2. The keyboard also required very little bending to come out - definitely not enough to cause any concern. If you have an air pump handy, it's a good opportunity to clean the area under the keys, which is full of crumbs. Yikes!
3. There is no need to remove the old thermal paste & apply new one, except after having done this whole process several times and the paste is full of your fingerprints (and crumbs). If you disassemble the laptop right after you shut it down, the paste will be plenty hot enough that the heatsink will come right off. As Robert says, the heatsink will stick back on the CPU thermally the next time you operate the laptop.
4. When you see the inside of the airducts of the heatsink completely clogged with fluffy dust, you'll realise what the problem was. Clean thoroughly. Again, an air pump to blow the air ducts clean (from the outside towards the inside) works marvels here.
Don't forget to clean the flaps of the fan and, most importantly, between the flaps and the frame, the circular chip that surrounds its revolution axis.
5. When reassembling (as well as disassembling, but more importantly here), do screw in the heatsink in the numbered order: first screw the screws until you feel the resistance rise, then do the final half-or-so turn.
6. Do not forget to put the strange small metallic support on top of the heatsink but before the keyboard. Like I did.
The only remaining problem with my Amilo is that the lid wiggles on its hinges by a couple of degrees, as if the pivots have got looser. Any idea how to fix that?
Thanks again,
Symeon Charalabides (cosmopolite trainee)
Thank you! This seems to have worked, my stupid laptop now makes a little humming sound again, rather the sound of 747 taking off. It doesn't seem to have overheated yet (:
A few notes on what I did.
Firstly, before I came here, I thought I'd get into the laptop from underneath. Big mistake, 26 tiny screws later, and I'm still not able to get to the processor...
I didn't need a star screwdriver, all the screws are standard philips crosshead screws.
Once into the heatsink, it was totally clogged with dust, as expected. Obvious where the problem was!
Placing the processor back, I took the advice of a post above, and removed the processor from the heatsink using a hot hairdryer to free it from the thermal paste, and placed it back in its slot like that.
Then turn on, to a black screen. Uh-oh! Turns out, that what I hadn't noticed was that there is a little lever used to hold the processor in its socket, which you have to lift up and push down to hold the processor in place. Obviously I'd missed this, because taking the heatsink out the first time, the processor came with it!
Overall though, only a ten minute job, 2/5 difficulty rating, and saves me buying a new laptop (:
It worked great on an amilo 7820 that was shutting down due to overheat. I run a test, and cpu was above 70C in 1 minute before cleaning, now it stays at 55C.
I had one issue though: when I removed the heatsink the cpu was stuck in it, and was removed from its base without releasing the lever! (which is not accessible before removing the heatsink)
But i carefully unstuck the CPU from the heatsink with a screwdriver, removed the old tinfoil-like thermal conductor, cleaned all old paste with wd-40, cleaned everything with alcohol and put everything together. I used the cheapest available thermal paste. Everything works great now. Thanks :-)
Thanks for this info, it worked well for a D7800 too - don't know whether you could add tags or keywords to get this (7800) to show up under Google or similar.
I know that this machine's five years old and it doesn't owe me anything but it's nice to get a bit more use out of it. Thanks and regards, John.
thanks for this guide :)
Dude, I cursed Fujitsu-Siemens ever since I got home with this machine under my arm....however, thanx to your guide I can now use it again!!!!Thx a lot m8
Cheers
Roberto
Thank you. I fixed a amilo d7820 using your guide. It suddenly shut down before, but it's working great now.
Nice layout,
can you show me how to change a cmos battery on the amilo d 8820
thank you
I have read its lid lights on the keyboard, how do i do to turn them on?
Thanks for the advice , I'll try it out as my amilo 1818 keeps shutting down. This fujitsu siemens purchase has felt like a rip off from the start.
thank you! my amilo works just fine for now, seems we have got over with the heat-shutting down issues.
best
help how do I fix the non-starting problem. I didn't even remove the heatsink but did loosen it. reloosened and retightened but scared to remove totally. could dust have fallen in?
got v. brave and took heatsink out. found a spider in the cpu pins. cleaned V V carefully! still won't go on. PLEASE HELP. my email peter dot wrote at gmail.com
thank you for help
t: sami and mika from finland
Get a vacuuum cleaner and with the computer on use the vacuum cleaner to suck more air through the cooling system. It helps if you cover the part of the outlet not covered by the nozzle with your finger and lift the computer slightly off the table (to increase airflow). The little fan in the computer doesn't have enough power to blow the dust out, so give it some help. Works nearly every time and you don't have to take anything apart.
For those who decide to take it apart the quality of the thermal paste/cooling paste/heatsink compound (or whatever else you want to call it) DOES matter. Cheap stuff dries out after about a year and your system will over heat. DON'T use the old stuff as suggested above. The compound is only designed to be applied once and will not re-flow properly a second time. DON'T use too much! You MUST clean the old stuff off. For those of you wondering where I get this information - I am a senior electronics design engineer and have been specifying this kind of stuff for 20 years.
thank you for your explanation. Build Green, Scotty
Found very cool and unique info here in this blog. This is a great addition in my favorite blog list.
Dell - 15.6" Latitude Notebook - 4 GB Memory - 500 GB Hard Drive
Dell - 14" Latitude Notebook - 4 GB Memory - 500 GB Hard Drive (E5430)
Good details. Learning to clean the cpu fan, by reading like this is very fun and also with images is really helpful. I run a hp printer service center and also do laptop service so it is very much helpful for me and also our entire service team. Keep writing more on other computer parts also. Thanks
Really good and useful article which helps computer and printer service people. Cpu fan which sits on the processor has to be removed carefully otherwise the fixing slot can break. Thanks for the post.
Thanks for such good details on how to clean the cpu fan. We are into computer and home appliance service and it is fun to learn through online. Keep writing more.
Dust collected in the fan can slow down the fan and can also cause to restart your PC. Good post with good details. Post more photos on how to clean the fan and also if you can also post a video in the blog. Thanks from a computer and led name board display service person.
Very good blog post regarding cpu fan cleaning. We are into electronic name board service and learned a lot from online blogs like these. Thanks.
Thanks for sharing us with us which are unique. The collection and varieties are attractive we also need some tips present this types Metal Letters Chennai
LED Sign Boards in Chennai
Name Board Makers in Chennai
Post a Comment
<< Home